Friday, April 30, 2010

1, 2, 3...lovely luncheon

I needed some napkins, whipped out these bad boys from my favorite chunky muslin. Attempted to take a shortcut and fray out the ends, thinking it would be faster. So not the case. It would have been faster to finish them properly. They did turn out cuter this way. How'd I do it?

1) cut four 18" squares of fabric
2) sew a line/border about 1/2 an inch in from the outside of the edge, all the way around
3) pull out threads on the edges, this takes a while, but is so pretty it's worth it

Of course it will be a softer fuzzy edge when washed. Project takes about an hour, most of which is pulling out threads, which is soothing and satisfying.

craft room...what is missing from this picture


GeoTagged, [N39.37643, E119.37034]

I think this is the main reason I am so slow. This is my sewing table. Aside from the thread and scissors, there is no sewing occuring here. My trusty pfaff seems to live in my dining room. As soon as I get my shop opened, I am SO organizing this room.

Tuesday, April 27, 2010

cowboy quilts

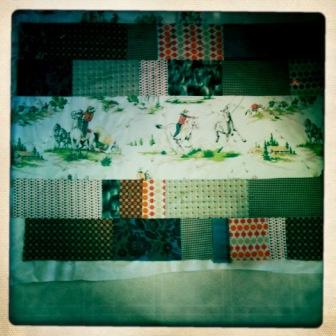
I am almost finished with Henry's quilt.  It is layered, pinned and folded awaiting quilting.  The plan is to do simple long channels on the cowboy sections and similar width, but alternating directions, for each of the smaller squares.  I think quilting is the hardest part of quilting.  Well, its not particularly hard (especially if you ONLY do straight stitches, like me) just very dull.  I find it more satisfying to get the top all sewn together.  Then you can truly see your quilt for the first time.

I have seen gorgeous hand quilted works of art and am amazed, not only by their beauty in design, but awestruck by the patience involved.  Someday, I want to make one.  I also have a goal to make a quilt with a bagillion little squares like you see at department stores.  So far, I have penciled in that project for when the shortest goes to kindergarten.  I figure I deserve 6 months after they are both in school to hobby vacation & sleep.  Ahhhh...

I thought I would walk you through the steps I did for this quilt.  It is extremely easy, and if you put all the minutes together, without major disruptions, it honestly only took 2 -3 hours, tops.

First, I am making 2 toddler (crib) size quilts. The directions below are for ONE quilt. I measured our "moo-moo" bedspread (aka Cars movie, kids used to say "moo-moo" for movie, and it was the only one they would watch, I have it memorized beginning to end), and determined I needed about 54" x 43", give or take. 

1.  I used my rotary cutter and board to cut two 12" strips from the twin sized vintage cowboy sheet. I left the full width so I could line up the cowboy pics to my liking.

2.  Then, I cut 6" strips, cheating by first folding the fabric in half, selvedge to selvedge, of the coordinating fabrics. I cut two strips each of the main colors I wanted to use and only one for my accent color.

3.  I took each strip and cut them in various lengths.  12", 10", 6", 5", 4", 3".  I didn't really think about it.  I did plan to use some of the 6", rotated 90 degrees so I could have the pattern going left to right, instead of up and down. As long as I had some of the larger strips, I could always shorten them, if needed.

4.  I measured out about 44" and started laying out the gene stripes.  Mix and match, switcheroo, I changed it around until I was happy.  Then I took a picture, just in case something goes crazy awry, so I can always look back.

5.  I gathered each piece of stripe from left to right, and clipped them together as a row. Then, I stacked the rows from top to bottom.

6.  I took each pile, and sewed the pieces together, right sides together with a half inch seam allowance, forming the row.  I did this for each, keeping them in order from top to bottom.

7. Moving to the ironing board, taking each row individually and flipping over, wrong side up. I ironed each of the seams open.
8.  Then I took the first two rows and placed them right sides together, sewing the two rows together to form one wide row. I repeated this for each pair of rows, making 3 large rows (top, middle, and bottom.)
9. Pressed the seams out (just like #7) for each row.

10. I took the bottom row and placed it on my dining room table. I let the fabric slightly overhang the edge.  Above the row, I added the cowboy panel, lining up the cowboy pics as I wanted them. 

Then, I flipped the cowboy row down over the bottom row.
11.  Sewed the two rows together.  I returned the sewn bottom section to the table, lined it up and added the middle row.  Sewed together. Then, the top cowboy panel, and finally the top row.
12.  I trimmed the excess fabric from the cowboy panels.  I ironed all the seams away from the cowboy panels and towards the gene striped rows.  It was my personal preference, since the cowboy fabric was light ivory and I just don't like seeing the seams under the fabric.

13.  Now the fun part.  I had a large piece of chunky nubby muslin (very cowboy, no?) just under two yards long, and I only needed about 54", so I totally lucked out, yay.  Since it was just regular width (44/45") it was perfect, no sewing required.  I swept my kitchen floor, laid out the muslin wrong side up, laid out a pack of crib sized batting (45" x 60", 80/20 cotton/poly blend) on top, and then laid on the quilt top, right side up. 

14.  I carefully flattened it out and pinned the cannoli out of it.  Yep, the key to good quilting is safety pinning all three layers together, from the center out.  I put pins almost every 5" inches, just so it doesn't move at all, other wise my quilts end up getting wrinkled at some point. 

The next step will be quilting all of the seams of each "box."
Well, that's only how far I have gotten.  Its been waiting for me to quilt it since Saturday, I hope to have it (and its cohort) finished this weekend.

Saturday, April 24, 2010

THE most yummy delicious chocolate cake


Whilst flitting around looking for a recipe to cook pork ribs on the barbie with maximum flavor and minimal effort (recipe under progress) I saw this little number on the sidelines of the Serious Eats site. As a girl who has issues with chocolate baked goods (as in love 'em, but can't make them not taste like I dipped a spoon in cocoa powder and licked it), I am always willing to try new recipes.
This lovely has mayo in it. Not  the usual sour cream, which for some reason we never have in our fridge, I thought, hey, this might be easy. After foraging for enough cocoa powder, I had to use half Hershey's and half Penzeys Natural Cocoa Powder, I had exactly enough. This cake was super simple to make. It made two nine inch rounds (one of which I banished to the other side of the fence, for pants sake- mine not Ms. Dylan's). Absolutely the best chocolate anything I have ever made. Super easy, only takes 40 mins tops(mixing and baking) and totally passes the cake sans frosting test, as in you don't think of frosting while you eat it. Although next time, it's gonna get it.

Chocolate Mayonnaise Cake via Serious Eats
(my piece for the picture got devoured, sorry)

Makes 2  nine inch rounds.

3 large eggs

1 1/2 cup + 1 tablespoon sugar
1 tablespoon vanilla extract
1 1/4 cups mayonnaise
2 1/4 cups all-purpose flour
1/4 teaspoon baking powder
1 3/4 teaspoons baking soda
3/4 cups + 1 tablespoon dutch-process cocoa powder (I used 1/2 Hershey's Cocoa Powder and 1/2 Penzeys Natural Process Cocoa Powder)
1/2 teaspoon salt, generous
1 1/3 cups hot water

1. Preheat oven to 350 degrees.
2. Spray cake pans with baker's spray (the kind with flour in it, I recommend Crisco or Pam).
3. Using mixer, mix eggs and sugar.  Mix until it changes color and is smooth.
4. Add mayo and vanilla.  Mix until combined and smooth.
5. Add the rest of the dry ingredients (flour, baking powder, baking soda, cocoa, and salt), mix until combined and smooth (it will be thick).
6. Microwave the water until almost boiling. Pour into mixing bowl slowly and mix until super smooth and until its a thinner even consistency.
7. Pour into cake pans and bake for 20 - 30 minutes.  I checked mine  at 20 because I have a crazy oven, but it was done about 25 mins. 
8. Let cool on a wire rack in the pan for 10 mins, then turn out and let cool completely on the rack.

Delish!
BTW on the site there are comments about mayo having pepper and stuff in it,thus making the cake wierd. So please, use mayonnaise.  Plain, regular, normal mayo.  None of that Miracle Whip or flavored stuff, okay?

Friday, April 23, 2010

3...2...1...organize! kitchen cabinet redo


A constant battle... the fridge.  (the Team Edward sticker is for my hubby Ed, hee hee hee, we are probably the only people alive that haven't seen the Twilight Sagas or that Avatar thing, now its kind of fun to say you haven't seen it, makes me feel special, anyhoo...)  While it offers ample display space of what-nots for my itty bitty house, it usually gets overrun with coupons, lists, appointment cards and my weekly To-Do list. Yes, I actually list all of my household chores by day and post it on my fridge. 

Disclaimer(s): 1. This list actually does cut down on the constant "nagging" of chores that occur when you have a house full of kids. I know that if I follow this list daily, I won't forget to take the garbage out on Tuesdays and everything that needed to be cleaned, did in fact get cleaned at some point that week, regardless of current appearances. 2. I don't use the list as much as I should. 3.  Just looking at it makes me feel productive and happy,which is strange on days when I don't do chores...

In an effort to cut down on the amount of paper ephemera (don't that just make it sound lovely, darling?), I figured I needed a bulletin board of some sort. Two vintage lovelies later, both of which became covered in the boys' artwork, I decided I needed another space so I could actually SEE my reminders.  I remembered reading a magazine that put corkboard on the door of the kitchen cabinet and I figured, wouldn't it be better to put it inside the door, where it doesn't make my kitchen look and feel that much smaller.  So, to the Lowes I went, where I bought a four pack of cork (with included adhesive tabs), all for under $5 bucks.

Here it is, a super cheap, super easy, super decluttering DIY.  Okay,  I guarantee it will force you to sort your mini-paper clutters, but technically it kind of hides it. That is a good thing, especially if you are like me and need like three different reminders of the kids dentist appointment.   I chose to use my drinking glass cabinet, because we open it repeatedly everyday. Lots of exposure = remember.  Well, that is my theory and I am stickin' to it.

1. My cabinet door inset was about 11.25" wide x 23.25" tall. First, I put up the four adhesive tabs in the four corners of the door inset.  Then, I held up a cork square and estimated the two adhesive tabs for the middle.
2. Hold up one of the cork squares, putting the bottom and right side inside the inset.  Draw a line where it over laps the door inset on the left.  Take it down and trim. I used an old Fiskars rotary cutter and board. Zoom...easy peasy.  Take the second cork square and use the first as a template for the width.  Zoom...done. Now hold the first square in place on the door, and place square #2 above it.  Mark where the cork overlaps the top.  Take it down and trim to size. 
NOTE: be sure to keep the paper on the adhesive, or the cork will stick while you are measuring.

3. Peel back adhesive protectors and stick up cork square #1.
4. Repeat for cork square #2.
5. WooHoo, do a happy dance and decorate as desired.  Lovely.  I got little pushpins especially for this from Paper Source here. So cute. 


I had extra cork squares, so I loaded up the spice cabinet, too.  Perfect for writing down those spices you still need to order... (p.s. ignore the catastrophe that is my spice cabinet, sorry)

Thursday, April 22, 2010

cowboy quilt, boys room BEFORE


Weekend warrior that I am, I will finish this quilt. Ok, I just started, and well, I just really want to get the top done on one. I am redecorating/first decorating the boys' room. They have adorable matching beds and I want their quilts to match. I found this vintage sheet on eBay and loved it.

Then, I dug around my wall-o-fabric and pulled out these guys. The goal was to not buy anything, to use what I already had. So far so good.
I wanted something simple and all boy. Something kind of modern and not so kitchy. I also knew I am lazy and wanted something easy peasy. While watching Dear Genevieve on HGTV (how I actually caught a show that wasn't House Hunters I will never know- what has happened to you darling HGTV???) she was doing a playroom redo. The mom was a graphic designer and the dad was a science teacher and Gen decided to do chopped up stripes resembling a gene test. My brain switched on and I came up with broken stripes on my quilt design.

This seems super easy, but it will be my first attempt on my own design/pattern. We shall see. Oh, and btw, only third quilt ever.
hee hee hee, took the funky photos with Hipstamatic with my iPhone. Lovin' it. (INSERT HUGE SMILE HERE) Woo hoo! Gives the post a new feel. I don't think I have ever LOVED an electronic device.  I think its mainly because its so much faster than the D-word.  And I just found this app that will let me post with pics to blogger.  Might just be the best $2 I have ever spent.  Better watch out D-word...

Heather Ross...how do I love thee...let me count the ways


1.  Your fabrics, are the soul (yep, hit me right there) reason I really picked up sewing.  I had always wanted to sew, but hated the basics that I find at traditional yardage shops. When I found your book, Weekend Sewing, and realized that all those gorgeous fabrics were your design.  My heart skipped.  I kept searching for every one of those patterns, thus finding a new world of new fabric designers.  Stuff I would want to use, stuff I buy 'cause I love it and will find a use for it later.

2.  Your voice on your blog makes me wish I knew you. Heck, I feel like I do already, if that makes sense.  I like you.  Please be my friend. We like the same things.  Ice cream, pretty flowers, polka dots, bicycles, horses, farmers markets, goldfish (black moors - my bug-eyed friends were named Juan and Chubby), and then the wiener dogs (Sugar)...then snails and unicorns...and now the owl and the pussycat, all in lovely vintage colorways that screams early eighties on a self-made forest trail in my backyard. I don't know how you do it. You rock.

3. You have a crazy brother. I mean crazy in a good, happy, loving sense, I, too, have a crazy brother.  Crazy as in the stories that might involve possible felonies, or strange outrageous situations meeting random people, or sheer brilliance in spite of (and against) any formal training.  I, too, like to offer "suggestions" that are usually not so successfully recieved. That's my job as big sis, right?
These boys are magical and mysterious and insanely talented. Crazy funny. Crazy bighearted. Crazy brilliant. I love mine like crazy, just like you do yours. Below one of Jonathan's pics.


4.  Your story of success is constantly evolving. Inspirational. Personal. The choices you have made are so blatently from your heart, that you have stayed  true to your self and what you love doing. I want to do that, too. You opened my eyes to "designing your own fabric" really? You can do that? HOLY CANNOLI! No way...awesome. The wave of new designers flooding the marketplace, you helped us (okay, I still have to covert my drawings to computer, make a yard, sell it by the end of the year- my 2010 resolution, but I am on my way). Thank you.

5. Every new thing you do, makes me love you more.  (See more of Heather Ross' new line Far Far Away II on her blog here.)

HAPPY EARTH DAY! I took the HANDMADE PLEDGE!

 
Happy Earth Day! Yes, its April 22. We had one heck of a windstorm last night. This morning, as I was stretching while walking down the hall, feeling a tight sting from my sunburn, sleepily noticing how bright it seemed outside for 630, low and behold, it was snowing. I kindly (yeah, uh...kindly) reminded myself I live in the desert.  I ran to my kitchen window to look at my poor tomatoes and peppers.  Poor windblown, snowed on, tomatoes and peppers.  Blast! I just changed my banner too!
Anyhoo, that is the wonder of the world.  But apparently the Reno area has recorded snowfall for every month of the year.  It makes me wonder if they are including Tahoe in this record...

Bad weather brings good things.  For example...I get to work on my projects...my super long list o'projects.  I have so many items on my to do list, I shouldn't be shopping at all. But, in reality, I can't make everything.  So, instead, I have taken the Handmade Pledge.
Buying handmade supports so many wonderful things, and Earth Day is all about making the world a better place. 

better than bunting...

Here are some lovelies I have bookmarked that are just as fabulous as the real thing.

Set of colorful plates and saucers by Ninainvorm via Etsy

Magnetic wall art by hjrdDesign via Etsy

party pennant pillowshams by katherine j lee via Etsy

Mini Happy Birthday Cards by merry blues art via Etsy

Wednesday, April 21, 2010

Poster Effect

I am having a ton of fun this week procrastinating.  Hence, the multiple posts about Etsy finds. I also discovered the scheduling tool on Blogger, but as a momma, when you get free time, you gotta roll while you still can...
I have a multitude of personal obsessions: mini doxies, garland/bunting, cupcakes...the list goes on and on, one of which is quotes... here's a poster edition...of yes, stuff I found on Etsy...you know you love it too.

Such a gorgeous poster. Simply gorgeous.
 Oh Darling, Let's Be Adventurers Screenprinted Poster by fifi du vie via Etsy

As a momma (of two very smart little mini-men who love to learn new words), I choose very carefully the items that slip my lips.  This cracks me up and I would so buy it if I didn't have to worry about the four year old and his learning to read, ahhhhh.  "Childproofing" is a never ending process.  Love the English flair, here's my dumb yankee question...what or who IS Gordon Bennet? Oh, and I am so googling the definition of flamin'nora, so friggin' awesome (to quote Miss Dylan).
Old Lady Swearwords poster (love the name) by sian kellaway via Etsy
 This year marks our fourth at our itty bitty house, the third for our itty bitty garden.  Heaven help me, please grow little itty bitty garden, and big guy up there...please strike down those four inch caterpillars from hell.  Yes, they are four inches long, eat our precious tomatoes, and we have no clue where they came from. I hate them, I have words that are not on the above poster for them.  Anyhoo, below is a wearable poster. Love!
Grow Your Own Food T-Shirt by Happy Family via Etsy
 

Here's one that seems like its channeling my mom.  I can't tell you how many times I heard "Quit futzin' around..."
Get On With It Already 8x10 print by Orange Beautiful via Etsy 
And last, but certainly not least..zombies.  Just too cool.  I love zombie movies, but haven't seen many lately.  In fact, I haven't seen any except one or two since I was preggers with the four year old and saw the scene where the pregnant lady turned zombie and then went into labor and gave birth to her zombie baby.  Freaked me out. I keep forgetting to buy this for the hubby's garage...
DANGER ZOMBIES RUN HAND PRINTED LETTERPRESS POSTER BY YeeHaw Industries via Etsy

gushing over garland

I obsess over garland and bunting.  Here we go again...
P.S. I have come up with a few ideas of my own and will be opening up shop soon! Keep your eyes peeled...

Spring Garden Vintage White Bunting via WillowandBloome on Etsy

White Voile Bunting via Cox & Cox
Vintage 1922 Photo Album Garland by Vintage Scraps via Etsy
adorable mini banners by Perch Papiers via Etsy

Eco-lovely

I am trying very hard to become more earth-friendly. I will admit I am lazy, and that is the main reason some things slip by me. I was flitting through Etsy yesterday and found these lovelies, Bird-E towels (formerly unpaper towels) by AthenaCreates.  So cute and perfect.  I couldn't stop thinking about them. I am ordering them up today.  Totally satisfies my goals to convert my cleaning habits, while indulging my lazy side (aka - I don't have to galavant around town trying to find the perfect absorbant fabric and then try bribe my neighbor to serge them.) 

Wednesday, April 14, 2010

I am a cake girl. aka Thank heavens for Ina...

The infamous cake or pie debate. I am getting older and have grown to love fruit and pastry. YUM. Delicious. But if you had one last dessert to eat, or you had to choose one to eat for the rest of forever, for me, cake wins. hands down. I just found the best recipe for cake that I have EVER made and its all I am ever gonna eat. It would be my last dying food wish. Thank heavens I ran half of the cake over to Miss Dylan, cause I would eat it all, and my hips would torment my pants that are already a smidge too tight, and my hubby would be mad that he 'got two bites and that's it?'
The recipe is the Carrot and Pineapple Cake from the Barefoot Contessa, Ina Garten. I love her. I want to win the lotto so I can buy a house on her block in the Hamptons. I bet if you lived next to her, you might get a "welcome to your new home" baked good. Or at least, when the ocean breeze wisps by you'd get a whiff of deliciousness.
Ahhh, Ina, I love you so. When I found your Coconut Cupcakes, I rejoiced. Now, they are a delicious but distant second to the luxury of Carrot Cake with Pineapple, with cream cheese icing. Oh heavens...

Monday, April 12, 2010

Macarons, take two...


Still loving my I Love Macarons book (see previous post) I tried these first at the inlaws in Seattle.  Something went wrong and they were all runny and flat like pancakes.  So, now were back in Nevada and they puffed up and formed the pied (little foot).  Fabulous. So I tried to make the buttercream recipe from the book. Not so fabulous. 
There is a part about making a sugar syrup in the microwave.  One minute, fine, stir, fine, nuke for 4 more mins, uh oh.  At about 2 mins 35 seconds, whats that smell??? Open the door, sizzling black sugared liquid boiling away in puffs of smoke.  I grabbed a towel, ran it out to the backyard and tossed the gunk and the bowl behind the garden bed with no garden. Back to reread the directions. Ahhhhh.  Her microwave is 500 watts.  Hmmmmm... oh, mine is 1300.  Note to self...read twice, cook once.  So after another attempt at the icing in the book, I quit, dumped the experiment in the sink and made some shortening based chemical frosting.  Delish!  Pretty sure chemical frosting does not belong in the french delicacy world but hey, oh well.  Its my kind of pastry, little bit trashy but super sweet, like me.